
The fuel storage bunker, which will allow me to store gas cans, propane, and other flammable or hazardous materials more than 100 feet from the house, is coming along. I have one major task left, which is to build the roof/access door or doors.

The 48 concrete blocks are set, giving me three levels. As you can see, the first and third level are is six blocks by two. The middle run overlaps by half a block, so it is five blocks by three. That makes the outside almost exactly eight feet by four feet. Those of you who know that a block is 8”x16”x8” and can do math have no doubt figured out that the interior dimensions are 16 inches less in both directions.
As you can see in the main image, I dry-stacked the blocks rather than used mortar. I did this for several reasons, the most important being low cost and ease of construction. This is not slap-dashed together, but it is not built to any kind of code. It’s more like a temporary structure that can be disassembled or relocated without much difficulty.
For example, while I leveled the spot as best I could, I did not dig a hole and fill it with gravel for drainage or make a concrete pad. I used a large square and a level and the first level was square. The third level was a little less square, possibly because there was some variability in the concrete block dimensions. If I had used mortar, I could have adjusted for these inconsistencies by using a bit more or less mortar, but that’s not possible with dry stacking.
Closing and Locking it Up
The lack of a firm foundation also means the structure is likely to sink unevenly. If it ends up too far off kilter, I will take my rubber mallet and knock the blocks back into place.
I am considering two options for the roof:
- Option one, use a piece of half-inch plywood for its structure and attach corrugated steel on top, much as we did when building the chicken coop.
- Option two is to build a framework from 2x4s and attach the corrugated steel to it.
I am leaning towards option one, thinking it will be simpler, although option 2 would be lighter.
When I told my wife about the roof, she said something to the effect of, “It better be lighter than the roof of the well enclosure at the last house,” which I admit was a bear to lift off the structure. I am thinking of cutting the lid in half to reduce the weight. This will allow us to open one side or both. It means twice as many hinges, padlock hasps, and locks, but that’s not a big impediment.
And just so no one accuses me of stealing someone else’s design, I freely admit I borrowed the idea from the video I saw on YouTube and adapted for my use. Unfortunately, I can’t find the video now to give the original poster credit.
Logging and Clearing
I went up the mountain to cut trees with the son of a family friend over the weekend. He works as a forester, so this was all in a day’s work for him and a big help to me. In fact, from what he told me, this was a small job.
The primary goal was to grant me access to the spring and the pipe running from it. Our spring in on a slope and was covered by fallen, bent, or broken trees from four to ten inches in diameter. The secondary mission was to harvest what wood we could and turn it into firewood.
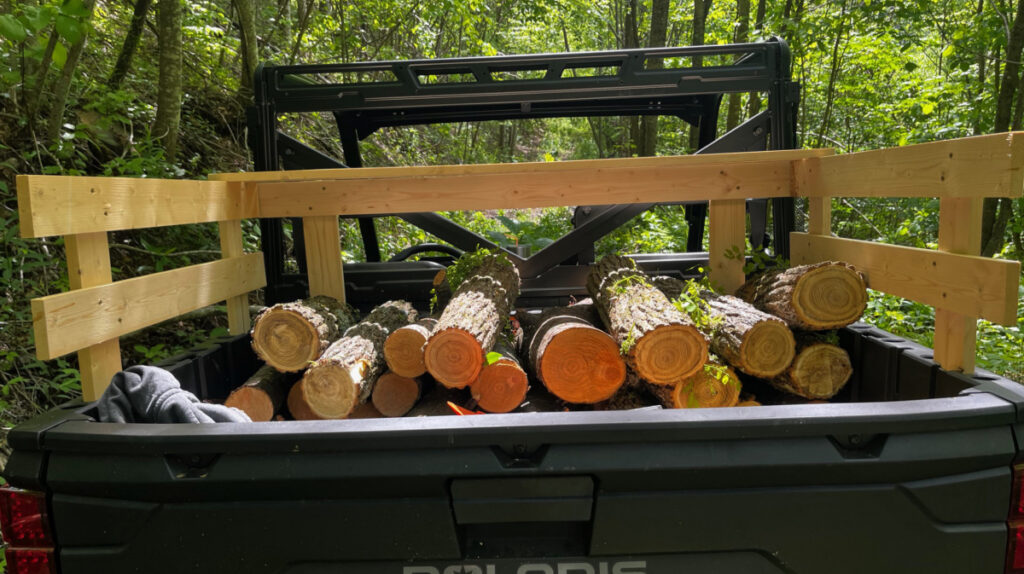
Since he was the skilled sawyer, I let him fell and de-limb the trees while I then bucked the resulting logs into round and loaded them into the back of the Polaris. The smaller logs in the image are locust, while the larger ones with a hint of orange to them are cherry. Both make great firewood, although locust burns longer. You will note the locus has some green shoots. Many of the fallen trees have enough in their root ball or the ground below to try to grow. The locust refused to give up on life and was trying to sprout new branches along its trunk.
The area around the spring was a tangled mess. There were so many branches, we could not even see the pipe. We cut, chopped, hacked and lopped to clear it out. When we uncovered the pipe, I could not tell if it was leaking because it was so wet in the area. I suspended it over some just-cut logs. When things dry out—which, judging from the forecast, could be a week away—I’ll go back up there and search for leaks.
Grape Vines
I saw firsthand that when you cut a wild grape vine, clear liquid really does run out, which I had always heard was the case but never seen. Since I was not in a survival mode, I didn’t drink it. I was, however, impressed by the volume of liquid and can see how it could be a thirst quencher in a scenario when there is no source of clean water. I make no claims about how it tastes or how safe it is to drink. (Do your own research.)
That may be the only thing these vines have going for them, because I have never seen them produce an edible grape. I don’t know if they are invasive in this area, but they are aggressive and do some damage to the host trees. They contributed to many a tangled mess while we were cleaning up. We even had to hack several out of the way just to gain access to the site.
The next day, I went back up the mountain alone and filled the Polaris twice as full as in the photo. Then I spent a tank of gas splitting the logs from both days. While some logs were small enough to burn without splitting, I like to at least cut them in half to allow them to season before we burn them.
Polaris Report
Trying to get the Polaris bed to tip up and dump when it was full of wood was impossible. The weight was just too much. Instead, I backed it up to the splitter and unloaded it straight from the bed to the hydraulic splitter. That worked out well because it eliminated the need to bend over. I then backed the pickup truck next to it and threw the split wood into its bed. I ended up with more than a pickup truck bed of firewood. Of course, it’s not a full-size truck, but I believe I split at least a face cord, with more to come.
Is this going to save me enough money to pay off the Polaris? No way, but it makes me feel better knowing that I am putting it to good use. And there’s enough downed wood on the mountain to keep me busy for several years.
If you are wondering, I looked at automating the bed so it lifts at the push of a button, but it costs $600 to $800, so that’s a no go. However, I took advantage of my Memorial Day 20-percent-off coupon at Harbor Freight to buy their Apex 5500 winch. The coupon saved me $52. Now I just have to remove the bumper and mount it.
The Bees are Buzzing Along
I try not to open the productive hives when the bees are making honey because I don’t want to disrupt the flow. Instead, I lift the lid and peek inside to see if they need another super. I have several smaller hives, which came from nucs or splits, that I still need to monitor, so I am making forays into the bee yard every week or ten days. All the small hives continue to grow, although not as fast as I would like. I think I should probably feed them more to help boost their growth so they are stronger when the honey flow starts. I’ve made note of that for next year. This is the first time I have had four or five small hives at one time as I’ve made more splits this year than ever before.
Last year, we had a single hive that produced as much honey as four or five other hives combined. I hope I have two or three hives of that caliber this year. It is early in the season, but so far, things are looking good. We are still planning to pull honey in three weeks, so I will know more then.
The weather has been unusual. After a warm, somewhat dry spring, we hit a spell of colder weather with days of rain. We haven’t had a frost, but there have been nights in the 30s and days that never got out of the 50s. It’s been hard on the garden, and we have held off planting seeds in the ground, except for sunflowers and a few herbs. Once this rain ends and we see some sunny, warmer weather forecast, we’ll sew our seeds. The next full moon is June 11, so it should be an auspicious time to plant.


