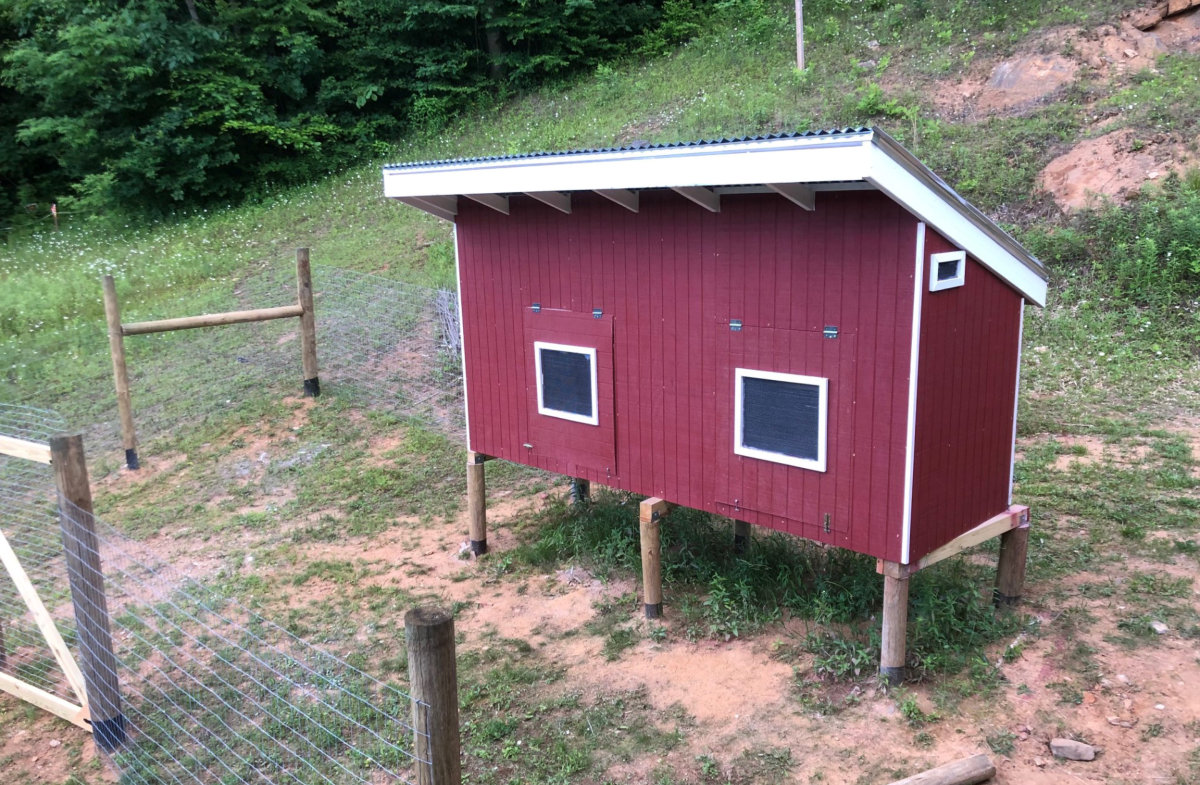
We’ve been getting rain storms on and off for the past couple days, so outdoor work on the chicken coop has ground to a halt. There are, however, things we can do inside for this project.
The chicken coop floor is going to be 12’x4’, so I cut a piece of plywood in half. When butted up against a full sheet, this will give us the full length. Then I painted both pieces with a durable exterior paint. I used an enamel because I wanted it to be glossy. I also painted the edges. When they dried, I flipped them over and painted the back side. Why do the edges and the underside of the floor need paint? To minimize water penetration and rotting.
Framing the Walls
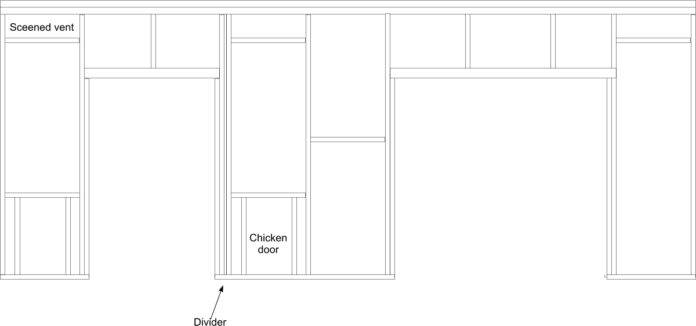
I spent several hours yesterday taking the big-picture plans I have for the chicken coop and converting them into a detailed drawing to serve as a guide for the framing.
If you do framing regularly, it becomes pretty easy and automatic. But for someone like me who rarely does it, getting the math right is critical to keeping everything square. For example, the floor is 12 feet by 4 feet. That means the long walls will also be 12 feet long. But the short walls will not be four feet long because they have to butt up against the long walls. They are seven inches shorter, or 3-feet-5 inches. If you build your walls to be 12 feet long and four feet long, you’re going to be scratching your head when you go to set them up and will have to either redo or undo the work you just put in.
Adding to the complexity, the roof is slanted, so I am building a rake wall. That means one end is four feet high, but the other is five feet, four inches. This is to give the roof a 4:12 slope, which is the minimum angle required to manage the snow load. This means that all four studs in the wall are different lengths. It also means that the top of each stud has to be cut at an angle of 18.43 degrees. Framing a wall with a slant is more complicated than building a square or rectangle! I have to do two, but they are identical, which means the measurements for one will work for the other.
They build traditional houses with studs on 16-inch centers. For this chicken coop, which is much smaller than a house with a lighter roof, we could probably go with 2-foot centers. This would save me some time and some 2x4s. I stuck with 16-inch centers on the load-bearing walls.
Inserting the Sills and Headers
Before you can build out your framing, you need to know where your windows and doors are going to be so you can plan for the headers, trimmer sand cripples. These are various pieces of the wood framing that help distribute the load from the roof and make sure nothing sags.
I used to live in a house that had a 14-foot opening in the living room that housed a wooden four-panel Andresen sliding doors. Over time, the doors got harder and harder to slide and we stopped using them. We eventually fixed the problem by removing the doors and planing between 3/16ths and a quarter inch off of the top of each door. Why did we have to do that? Because the center of the 14-foot span had sunk so much that the increased friction was preventing the doors from sliding. That’s a good example of why headers have to be very sturdy. Thankfully, that won’t be a problem with this tiny structure.
Of course, before you can put your headers in place, you need to know the size and type of windows and doors.
Simple Windows
While the local ReStore has used or surplus windows available, we have decided to go with old fashioned holes in the wall covered with hardware cloth. That’s right, no glass to clean and no complicated installation procedures. This is a chicken coop, not a guest cabin.
If it gets cold enough that we need to close the windows, we’ll put the piece of wood we cut out over the hole or, if we want to preserve the light, we’ll screw a piece of Plexiglas over the opening.
Multiple Doors and Hatches
Our chicken coop design calls for several different doors, none of which are traditional. First, we have the small doors designed to let the chickens in and out. These are usually about a foot tall and eight or ten-inches wide. We plan to use an automated door opener that will open the door after sunrise and close it at dusk. But there are several different models of these doors available, and they are different sizes. Most of these doors are vertical, but the Omlet door is horizontal and is 19.25 inches wide. Clearly, we need to determine which door we will use before we build the opening.
Second, we will use a door, or a hatch, to give us access to the nesting boxes so that we can remove the eggs. These will actually be places where the exterior wall can swing up and out of the way on hinges. The reason for this is that we want to gather eggs without entering the chicken run or the garden, so that we don’t have to open any gates or disable the electrical fence.
Finally, we big humans need access. But with the highest wall only 5-feet, 4-inches, we aren’t going to be using a traditional door with a knob and hinges. Our plan calls for us to swing up access doors that will allow us to reach inside the coop, add new bedding, clean the coop, and provide maintenance. These large hatches will use 4×4 headers while the other doors will need only a 2×4.
It’s a Duplex
I designed our coop to have two living spaces, so we jokingly call it a duplex. We will take the coop and divide it into two sections: a 4’x4’ and an 8‘x4’ or leave it as a single 12’x4’ space.
Why would we want to do this? In case we need to house some chickens separately. For example, if we decide to raise chicks while we still have adult birds, we could put them in the small section. If one hen is especially broody and we want her to raise some eggs, we could set her up in the small area so the other birds don’t pester her or try to run her off of her nest.
The downside is that this means we need human access to both sides of the coop.
All told, we plan to have:
- Two windows
- Two chicken-size doors, only one of which is automated
- One long access hatch for the nesting boxes
- Two human-sized access hatches
Of course, we need to plan where those go before we can frame the walls.
Exterior
Based on the pricing, I’ve decide to go with T1-11 plywood for the siding. To add longevity, I plan to paint it as well.
When I look at what I have in stock, I figure I need seven sheets of T1-11 and 18 more 2x4s. Knowing how useful 2×4 s are, I’ll probably get at least 20.
Catch up on what you’ve missed by reading our prior articles on chickens and chicken coops.

