
Construction of the garden fence and the posts to hold up the chicken coop continued after picking up gravel and bags of fast-setting concrete.
Our first step was to use the posthole digger to remove any dirt that had fallen back into the hole which was the case in most holes. We then picked the appropriate fence post for each hole and used it to tamp the dirt down. Posts on corners or that will be a gate post got the thicker six-to-seven-inch posts. The remaining posts were four-to-five inches.
We then removed the post and scooped in a few shovel loads of gravel. We wanted to get gravel at least four inches deep. The gravel at the bottom of the hole will allow water to drain from the hole rather than accumulating there and rotting the end of the post. We also used the gravel to level out our holes by adding extra gravel to any of the holes that were so deep they would not allow five feet or more of the pole to stick up above ground.
Protecting the Posts from Rot
I researched several ways to prevent the posts from rotting, and I settled on a combination of methods.
First, we used treated wood posts.
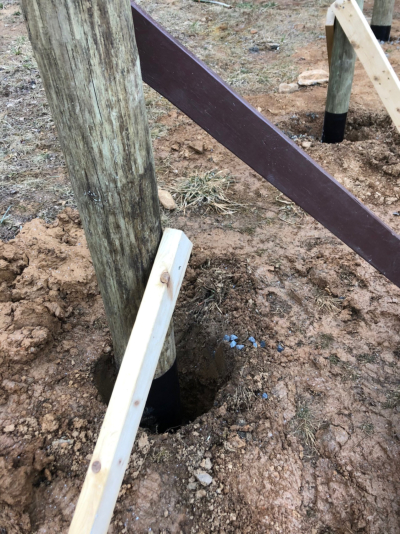
Second, we wrapped the posts in twelve inches of black rubber window flashing. This flashing come sin large rolls, so we cut it to wrap around each post and then removed the release paper and stuck the flashing to the post. Since I could only find six-inch flashing, we made one wrap below the ground level and then put another one on top of it, overlapping. This last level would stick above the ground level.
The idea behind the flashing is that it will help prevent moisture penetration and rotting at ground level and just below. This is apparently where the rot takes places.
Third, we shaped the top of the cement to slope away from the post. This way, any water that trickles down the post to the cement is more likely to run off the outside rather than in between the cement and the pole. Again, this should help minimize the potential for rot.
Getting the Posts Plumb
After we wrapped each post in flashing material, we had to get it in the hole and make sure it stood straight up. This is one challenge of using drilled holes; the holes are larger than the posts. This is not an issue if you use a machine that drives the post into the ground because the hole fits the post perfectly and the post cannot move around. If I was fencing acres of farmland, I’d go with a large piece of equipment to drive the posts into the ground, but it wasn’t worth the cost for a couple thousand feet.
We used two 2x4s, about four feet long, to steady each post. I screwed each 2×4 to the post with a single screw, allowing it to rotate up and down. One braced faced north/south and the other east/west. Then we used a level to check the plumb of the post. When it was just right, we’d hammer the other end of the 2×4 into the ground. I used 10-inch long nails that went through holes drilled into the 2×4 to anchor it into the ground. Once the braces were nailed in, we double-checked the plumb and made any final adjustments.
Pouring the Concrete
We bought 60-pound bags of quick drying concrete and we mixed them with water in our wheelbarrow one at a time. Then we would trundle over to the hole and pour, scrape, or shovel it into the hole. Then we’d work any bubbles out of the concrete with a stick and dress the surface to slope away from the post.
By the end of the day, we had done 40 percent of our fence posts. We had to stop and run out to pick up more concrete.
I had plenty of gravel, but nowhere near enough concrete. We ended up buying 14 more bags.
This job is taking longer and is harder physical labor than I expected. I am now doubly glad that we rented the mini skid steer auger to drill the holes. We will finish installing the posts on Friday, weather permitting.
Alternative Methods
Over the course of this project, we’ve been told a couple other ways to put in fence posts:
We’ve been told to pour the bag of dry concrete mix into the hole and either add some water or let the soil’s natural water turn the concrete from powder to hard concrete over time. I do not know if this method works, but it sounds like a lazy approach. If we’re going to use concrete, then I am willing to take the time to mix the concrete and pour it into the hole. This also allows me to dome up the crown of the concrete, as discussed above.
We’ve also been told to just pack the hole with gravel and if we tamp it down good it will hold the post, but still allow us to pull it out if the need arises. I’ve researched this, and it is apparently a valid method for use in heavy clay soils. We decided against it for several reasons. Chief among them is the idea that a big, 60-pound chunk of concrete ten or twelve inches across at the bottom of a three-foot deep hole will make the post that much more difficult to knock over.
This is the third fence I’ve had. The other two all used cement for the posts and the fences were still standing when we left. I’m sticking with what I know works.
To read about how we drilled the fence post holes, see this blog post from a couple days ago.


