
As fate would have it, not long after writing about buying new boots, my old Hi-Tec brand hiking boots failed. The sole peeled off while I was walking the dog. I had just crossed a stream (note that the water proofing remained intact) when the black lug part of the sole started flopping around. It was attached on the heel, but had peeled back to through the arch.
I thought about removing it all the way to make walking home easier, but I just took high, awkward steps, like I was wearing clown shoes. I also tried walking backwards, which was more comfortable. The dog gave me side eye the whole way home, like she thought I was crazy.
Two Lessons
Lesson: Carrying duct tape will help you make quick, temporary repairs in a situation like this. How do I know? Because I have repaired old boots with duct tape in the past. Good duct tape will hold the sole on long enough to finish your hike and them some.
When I got home, I inspected the other shoe, and the sole was detached on the side. When investigating to determine how far the loose part went, the entire sole pulled off except for the back where it curves up the heel. Clearly, I had reached the end of the line as far as their adhesive went.
Admittedly, these are old shoes. They date back to 2012 when I bought them before going to Utah for a ski trip because they were insulated and rugged. The upper is still in serviceable shape; the sole is the problem. I contrast this with the pair of Italian hiking boots I bought in the 1980s that lasted decades. Their sole was sewn on.
Lesson: Buy boots with sewn on soles for hiking and other intermittent use. Store boots with sewn-on soles for long term prepping purposes. Surplus combat boots are still my favorites.
A commenter recently recommended Loctite brand of shoe repair glue. I didn’t have any, but I had a tube of Shoe Goo. The packaging said nothing about gluing the soles onto your boots, so I did some online research and determined it should work. I also checked at my local hardware store for the Loctite shoe product and while they carried some Loctite products, they did not stock the shoe stuff.
Repairs
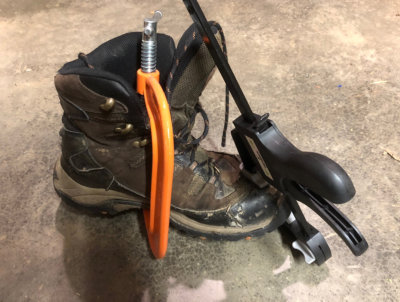
Figuring I had nothing left to lose, I applied the Shoe Goo liberally to the bottom of my boot. I then used a carpenter clamp to apply some pressure. What I had read online said this wasn’t necessary, but I did it in any case. I also made sure to apply glue to the edges and sides where the sole turned upwards. Then I repeated this on the other boot, using two clamps.
I had read anywhere between 24 and 72 hours as the time necessary for the glue to fully cure, so I waited a full three days before I unclamped the boots and tried them out. I will not wear them on any lengthy hike just yet, but I am comfortable wearing them on the property. So far, they held up for about two-and-a-half hours. During this time, I tended the chickens, burned some yard waste in our the burn barrel, and assembled two large beehive supers. That allowed me to wear the boots on mud and dirt, gravel, and concrete.
Since then, they have lasted through two more dog walks and a couple days of chores. I would say at least five miles. So far, the repair is holding.
While I would not yet trust them on a multi-day backpacking trip, even with some duct tape in my pack, I’m going to wear these daily for and see how it goes. So far, the Shoe Goo is holding its own.
In the meantime, I may look at the Hi-Tec Altitude VI I WP, which looks like the latest generation of my old boots.


